support wiki

helpful humans at 423-456-6700

User Tools

Site Tools


Sidebar

System Setup
Getting Started
Setup Wizard
Porting Numbers
Caller ID
Special Projects

Networking
Network Introduction
Recommended Equipment
Ideal Network Setup
Firewall/Network Configuration
  Routers That Should Not Be Used
Switches
Ubiquiti ER X Configs
How To Disable SIP ALG
Networking Disasters
OpenVPN on Grandstream Phones
Port Forwarding / External Remote Phones

Customer Admin Portal
Login
Dashboard
Coms
  Fax
  SMS/Text
  E-Mail
Configuration
  Basic Mode
  Extensions-Adding
  Extensions-Function
  Groups
  Receptionists
  Schedule
  Hold Music
  Advanced Mode
  PA Ring Tone
  Recordings
  Keys
  Tricks
My Services
  Numbers
  Lines
  International Calling
  e911
  Conference
  Backup
  Call Recordings
  Phonebook
My Account
  Overview
  Account Info
  Options
  Payment
  Wallet
  Reports

System Functions & Advanced Features
Schedule Override
External Storage: USB
Hold vs Park
Hunt Groups
Line Emulation
Relay/Door/Alarm Control
Feature Code List
Voicemail
Grandstream Wave
Zoiper

Paging
Paging
ALGO 8180 Manual Configuration
SNOM PA1+ Manual Configuration

Hardware
Hello Hub V2
Hello Hub Nano - Cloud Connector
Supported Phones (Auto-Config)
Grandstream HT801/802 Tricks
Pairing Instructions for DP750/752
Grandstream WP820

Reference Manuals by Phone Model
GRP2614, GRP2615, GRP2616
Getting Started
Connecting to WiFi
Get to Know the Keypad
Headsets - Wired and Bluetooth
Factory Reset

Deprecated
Hello Hub V1
Hello Hub V1 Battery Removal
Manual Config Phones

Advanced
Troubleshooting
Reliability
Switching Loops
Email Notes

Policies
Payment Policy
Cancellation
Privacy Policy - Mobile App
Privacy Policy - Website

System Variants
System & Hardware Variants

Required
Terms and Conditions
Software Licensing

Useful
Blog and Rants
HIPAA
Recording Phone Calls & Conversations

Menu

wifi-2614-16

Connecting to WiFi - GRP2614, GRP2615, GRP2616

To connect the these models to a WiFi Network, please follow the steps below:
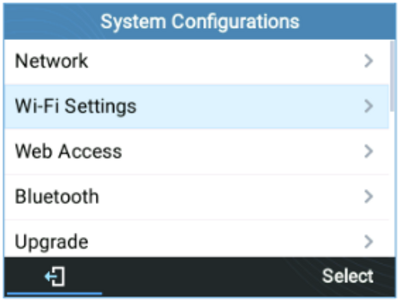
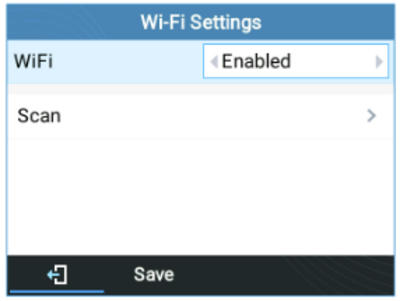
1. From the Home Screen, press the Round button between the 4 arrow buttons, and navigate to System → WiFi settings. Fig. 81: WiFi Feature
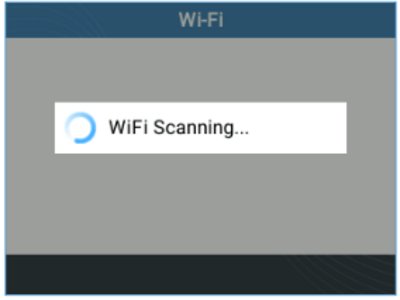
2. Set WiFi to Enabled and press Save button. Fig. 82: Enabling Wifi
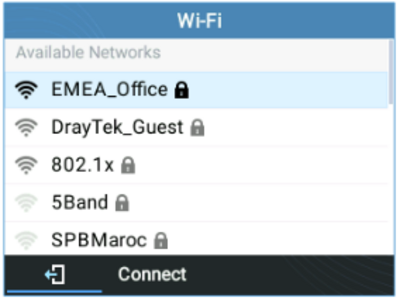
3. Select Scan. The device will automatically start scanning for WiFi access points within range. Fig 83: WiFi Scanning
4. A list of available WiFi networks will be displayed. Select the desired network. Fig 84: Nearby WiFi networks
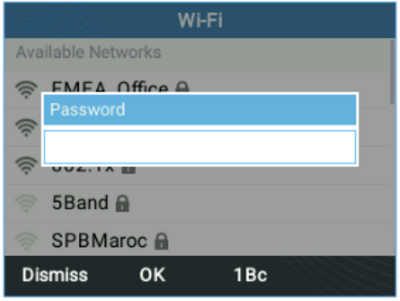
5. If required, enter the WiFi network password to connect. Fig 85: WiFi password required
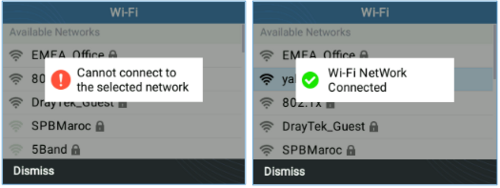
6. An incorrect password will trigger the error message Cannot connect to the selected network. - If the connection is successful a “WiFi Network Connected” message will display on screen Fig 86: Failed/Successful WiFi Connection
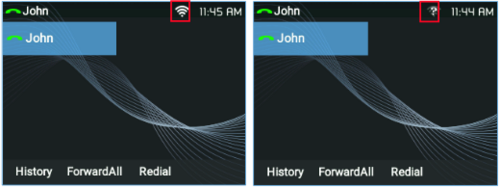
7. Check the WiFi icon on the Home Screen to verify if the WiFi network is properly connected. Fig 87: WiFi Status
8. A new section Current Connection will show under System → WiFi settings. Fig 88 : Current Connection
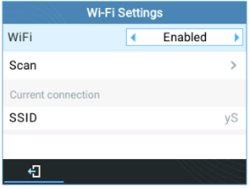
9. Selecting Scan, users may choose to Forget the current connection and establish a new one.

wifi-2614-16.txt · Last modified: 2023/02/16 16:44 by jim