support wiki

helpful humans at 423-456-6700

User Tools

Site Tools


Sidebar

System Setup
Getting Started
Setup Wizard
Porting Numbers
Caller ID
Special Projects

Networking
Network Introduction
Recommended Equipment
Ideal Network Setup
Firewall/Network Configuration
  Routers That Should Not Be Used
Switches
Ubiquiti ER X Configs
How To Disable SIP ALG
Networking Disasters
OpenVPN on Grandstream Phones
Port Forwarding / External Remote Phones

Customer Admin Portal
Login
Dashboard
Coms
  Fax
  SMS/Text
  E-Mail
Configuration
  Basic Mode
  Extensions-Adding
  Extensions-Function
  Groups
  Receptionists
  Schedule
  Hold Music
  Advanced Mode
  PA Ring Tone
  Recordings
  Keys
  Tricks
My Services
  Numbers
  Lines
  International Calling
  e911
  Conference
  Backup
  Call Recordings
  Phonebook
My Account
  Overview
  Account Info
  Options
  Payment
  Wallet
  Reports

System Functions & Advanced Features
Schedule Override
External Storage: USB
Hold vs Park
Hunt Groups
Line Emulation
Relay/Door/Alarm Control
Feature Code List
Voicemail
Grandstream Wave
Zoiper

Paging
Paging
ALGO 8180 Manual Configuration
SNOM PA1+ Manual Configuration

Hardware
Hello Hub V2
Hello Hub Nano - Cloud Connector
Supported Phones (Auto-Config)
Grandstream HT801/802 Tricks
Pairing Instructions for DP750/752
Grandstream WP820

Reference Manuals by Phone Model
GRP2614, GRP2615, GRP2616
Getting Started
Connecting to WiFi
Get to Know the Keypad
Headsets - Wired and Bluetooth
Factory Reset

Deprecated
Hello Hub V1
Hello Hub V1 Battery Removal
Manual Config Phones

Advanced
Troubleshooting
Reliability
Switching Loops
Email Notes

Policies
Payment Policy
Cancellation

System Variants
System & Hardware Variants

Required
Terms and Conditions
Software Licensing

Useful
Blog and Rants
HIPAA
Recording Phone Calls & Conversations

Menu

getting-started-2614-16

Getting Started

This page provides basic setup/installation instructions, including the list of the packaging contents, and also information for obtaining the best performance from your GRP261X series phone.

Equipment Packaging

Qty Item
1 Phone Main Case
1 Handset
1 Phone Stand
1 Ethernet Cable
1 Power Adapter
1 Phone Cord
1 Quick Installation Guide
1 GPL License

GRP2614, GRP2615, GRP2616 Package Contents


Using the Phone Stand

To install the phone on the table with the phone stand, attach the phone stand to the bottom of the phone through the phone stand slot. (Upper half, bottom part).

Using the Slots for Wall Mounting

  1. Attach the wall mount spacers to the slot for wall mount spacers on the back of the phone.
  2. Attach the phone to the wall via the wall mount hole.
  3. Pull out the tab from the handset cradle (See figure below).
  4. Rotate the tab and plug it back into the slot with the extension up to hold the handset while the phone is mounted on the wall (See figure below).

Wall Mount Instructions

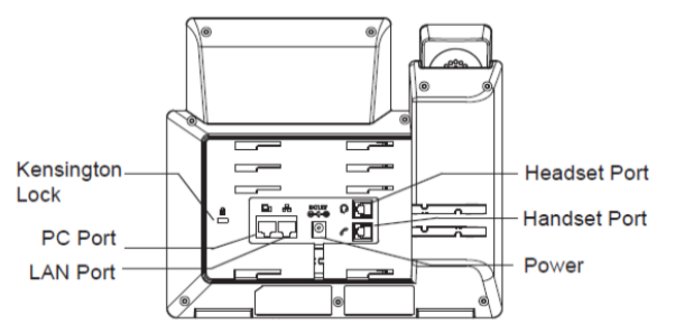
Connecting the GRP261X

To setup the GRP261X, follow the steps below:

  1. Connect the handset and main phone case with the phone cord.
  2. Connect the LAN port of the phone to the RJ-45 socket of a hub/switch or a router (LAN side of the router) using the Ethernet cable.
  3. Connect the PSU output plug to the power jack on the phone; plug the power adapter into an electrical outlet. If PoE switch is used in step 2, this step could be skipped.
  4. The LCD will display provisioning or firmware upgrade information. Before continuing, please wait for the date/time display to show up.
  5. Using the phone embedded web server or keypad configuration menu, you can further configure the phone using either a static IP or DHCP.

getting-started-2614-16.txt · Last modified: 2023/02/16 16:46 by jim