Table of Contents
Phone Line Emulation
Once upon a time, telephone service was provided on a pair of wires that had a phone number assigned to it. The first three digits got you to a region, the next three to an exchange (a smaller region) and the last four digits to a phone on that exchange. At modest levels, a 10 lines phone system had 10 pairs of wires, and 10 phone numbers. Of course, a lot of variation was possible, especially at larger customer levels. Incoming calls were grouped using a behavior known as “hunting” or “rollover”. Outgoing calls were made either using the caller id of a main number, or each individual line (pair of wires).
The modern VoIP/Digital business phone system emulates much of this behavior. A Phone Number will get you to a system such as a PBX (Private Branch Exchange) like the ring-u Hello Hub via digital internet connections, where and how it routes is up to the configuration of the PBX and less about the physical phone wires of olden times. Calling out a specific line or phone number can be a little trickier than the old systems where you pressed a button, and the phone connected to a physical pair of wires and the number attached to them. Ring-u has several ways you emulate that behavior that can be used together for very complex configuration.
Default Caller ID per Phone
 Assuming an account has multiple phone numbers, under each phone extension configurations advanced tab, you can select a default caller ID for that phone. If set, a call from that phones default account is given that Caller ID number and the Caller ID name associated with that number.
* Codes
 If more ad-hoc / as-needed use of specific phone number and Caller ID is needed, you can dial out using *# of the phone numbers. For example, if I wanted to call ring-u using the 4th number in my list, I would call by dialing *4 423 456-6700 . The *4 picked the 4th number for phone number and Caller ID for the outgoing call.
Line Emulation
Sometimes, the above two tricks are not enough. You want full on multi-line emulation. Possible, but ring-u does not automatically make that happen. It is possible, understanding some concepts and with a little old fashioned manual config. First, we suggest that you let the Hello Hub manage and configure the first “Account” on each phone, essentially “Line 1”. Mostly so that if your network changes, at least 1 line works. Then you can configure as many other Accounts/Lines as you want and the phone supports. Lets make some assumptions and get started:
- Important: You have a reserved “static” address for your Hello Hub on your network or a cloud system. The Hello Hub needs a consistent address for this to work.
- You are using 4 or more line phones. The Grandstream GRP2614 or GRP2616 is a good example. Polycom VVX series and others work the same, but our example screens are for GRP2614's.
- You have pre-mapped out your phone numbers and line configurations.
- You are letting the Hello Hub configure and manage Account 1 aka Line 1.
And now, step by step:

- Configure your system using the Hello Hub and automatic configuration, verify operation.
- Configure each phone number (My Services→Numbers→Edit) with a SHORT label. It shows up on incoming calls Caller ID's.
- Create a manual extension (Configuration→Extensions→Add an Extension) for each phone and line you want. In the example, “Bob” is extension 123 for the main Acme Insurance Company line, and is 323 for the Acme Roofing Company. You can choose any numbering scheme, this is just an example.
- Choose the Caller ID for these manual extensions under the advanced tab as desired.
- For each number, you will want to configure schedules and routing to receptionist or group of phones.
- For each phone, login to it's IP address with a web browser. For example if Bob's phone is 192.168.77.150, pointing your web browser to it like: https://192.168.77.150 and login with the phones login and password. If a GRP2614 or similar, the password may be on a sticker on the bottom of the phone, or in the customer portal under the autoconfigured extensions advanced tab. If you assign a new password to the phone, make a note of it and please add it to the customer portal under the autoconfigured extensions advanced tab. For example, if you change Bob's phone password to “chaosmonkey99”, put that password on extension 123 so the system still manages that phone.
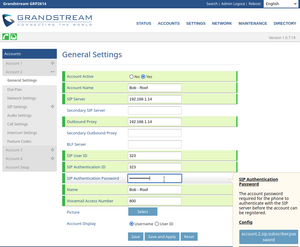
- On each phone, configure Account 2, Account 3, etc.. with the manually configured extension information, using the IP address of the Hello Hub for the SIP Server and Outbound Proxy. Use the password created for each extension. In the example, 323 for the SIP Authentication ID and the password from above as 8BFC9KT3iu76K6P in the Sip Authentication Password is the most crucial setting.
- Test. Each phone should now show multiple lines on the upper left. Pressing the line/account and then dialing should call out with the caller ID that the extension defaults to.
